Why Are Orthographic Drawings Used
If you ever wondered what is an orthographic drawing (also called an orthographic projection) and never quite figured it out, you've come to the right place! An orthographic drawing is quite different from an isometric drawing, but they are related! I'll explain that further below.
What is an orthographic drawing? An orthographic drawing or orthographic projection is a representation of a three-dimensional-object using several two-dimensional planes.
You can use an orthographic drawing to better see objects in 3D, or to plan a complex object or environment! There are a few more things you need to know about orthographic drawing, so let's talk about those.
Why Are Orthographic Drawings Important?
Orthographic drawings are important for artists to better see the objects you're drawing in a 3D space.
Not only it helps you do this, but it also allows other people that are interested in drawing that object, know all the specifics of the object in ANY angle.
Think of it like a blueprint for the object you're drawing!
Or imagine you're trying to describe a beautiful table to someone. It's easier if you just take a few photos from each angle and show it to them right? That would be something close to an orthographic projection.
Orthographic projections are also very important to use in Cartography (where the plane is projected into a globe) and computer graphics. It makes it MUCH easier to get the measurements right than, for example, using isometric projections (which we talk about further below) instead.
When using other types of projection, we tend to use perspective, and that makes the overall drawing unusable for measuring an object correctly.
The 6 Views Of Orthographic Projection
There are 6 views of orthographic projection, but mostly there are only used three of them.
The 3 main views used in orthographic projection/drawing are the Front, Side, and Plan (Top) view.
With only these 3 views, you can already have a very clear idea of how the object looks, and you can detail it quite well if you try to build a 3D version of it.
But as I said, there are actually 6 different views of orthographic projection, and these are:
- Top View (Plan)
- Bottom View
- Back View
- Front View
- Right Side View
- Left Side View
With these 6 different views, you can create a super detailed 3D object since all the angles are covered.
Artists should just use the 3 views orthographic projection if all 3 of these points are true:
- Both sides of the object are symmetrical. This means that you don't need to separate them into a right and left side view.
- The bottom doesn't matter for the product or is equal to the top (plan) of the object. If the bottom part won't be used (either on a product or on a final isometric drawing) then you can skip this view. The same is true if the bottom and the top part of the object are equally designed, since you already have a top view drawn, it would be a waste of time to draw it again for the bottom view.
- The front and back view of the object is the same. Basically the same as before, if they are the same there is no point in drawing the same view twice. Okay, it's not EXACTLY the same view, but the drawing would be the same. You get the point.
Above you can see an example of a 6 view orthographic projection done by flight-mechanic.com! Hope that image clarifies it better for you.
This is one of the most spot-on orthographic drawings that you can design, since it covers every little detail from every angle.
Orthographic Drawing And Isometric Drawing Differences
Even though an orthographic drawing and an isometric drawing are very correlated, there are a few major differences between them.
In fact, the major difference is that an orthographic drawing is a two-dimensional representation of an object, with all the views represented in it.
And an isometric drawing is a three-dimensional representation of that same object. Now, since we're drawing on paper we can't quite make it 3D, so we call it an isometric drawing.

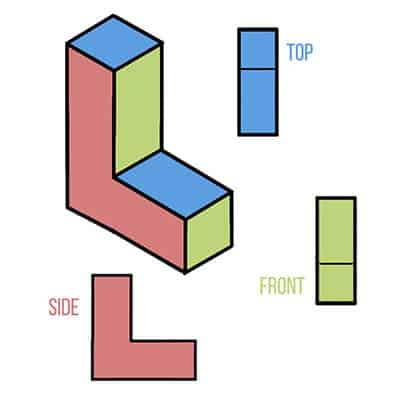
The isometric view is on the left and the orthographic view is the 2D planes broken down into separate pieces, on the right and below.
As you can see with the image above, there's quite a difference between an isometric view and an orthographic view, but you can create one from the other!
This is also a quite useful exercise to better place your objects and environment correctly with all the details, in different drawings.
Orthographic Drawing Examples
Now that you know all about what is an orthographic drawing or projection and why it is important, I'll show you some orthographic drawing examples that you can study from!
Feel free to copy these to practice and improve your artwork.
Practically all motorcycles and cars have orthographic projection
Even rings can be drawn orthographically, like this one! Any object can be drawn like this, just pick something up and draw it.
How To Draw An Orthographic Drawing
Ready to start drawing your own orthographic projections? Then let's do this.
The process is very simple, here's what you need to do:
- Choose an object. Doesn't matter if it's a small object or a big object or vehicle, it's totally up to you! My recommendation is that you start with a small object with fewer details, and then you can draw a bigger orthographic projection later on.
- Take photos of your objects. This part is important to get right, you want to take photos of your object in several different views without changing how far you are from it. Now how many photos you want to take or how many views you want to draw is totally up to you. My recommendation is to just start with the 3 main views we talked about (Top, Side, and Front) and then move on to more views as you get better.
- Draw the views! Now you just need to draw the views of the object! Try to draw them close to each other like the examples I've shown you above, so that you can keep the proportions right.
Here's a fun example of photos taken to an object in the 3 main views, and the object in an isometric view by "dlister86" on Instagram.
Remember that it's all about the practice until you get it right!
Your first few orthographic drawings might not look like much, but they will improve and get better the more you do them.
Related Questions
How many views do you need for an orthographic drawing or projection? As I said, in most cases 3 views are enough and are the most important ones to have. The front, side and plan view. But there can as much as 6 views to make the orthographic drawing more complete!
What are the types of orthographic projection? One of the types of orthographic projection is the axonometric projection, which is sub-divided into Isometric projection (which we talked before), Dimetric projection, and Trimetric projection!
Back to the Blog

Why Are Orthographic Drawings Used
Source: https://doncorgi.com/blog/orthographic-drawing-examples/
0 Response to "Why Are Orthographic Drawings Used"
Post a Comment